Monday, 26 January 2015

Photoshop: Pixel Art

Learning how to create pixel art.


I created a line 1 pixel thick at a 30 degree angle. Using this line I began to build a cube.


By flipping the 30 degree line and duplicating it I have been able to build the top and bottom of a cube, adding some straight lines joined up the two faces to form a whole cube. 


Again by using a 30 degree line I built a grid, this grid allows me to construct a circle that follows isometric rules. 


By creating an elliptical circle inside the grid you can see how it sits just touching the sides of the box. The circle itself is at a 2:1 ratio.


Extending the circle and box creates a 3D cylinder that is in proportion and works with an isometric view.


 I extended the cylinder and removed the construction lines. 


I then began building the hydrant. Unfortunately I ran out of time and didn't complete the hydrant. However if I have time I will return and complete the hydrant.


Next we animated a GIF.


By changing each frame and playing them in sequence we can create a small animation.


One of my finished frames.

Tuesday, 20 January 2015

Mudbox: Learning the Basics

Mudbox tutorial, learning the basics.

Creating a basic cube.

Using the sculpt tool to warp the object.

Adding a texture.

Falloff radius (paint tool).

Steady stroke to help guide the brush.

Sculpting using brush types.

Using a stencil to paint on the model.

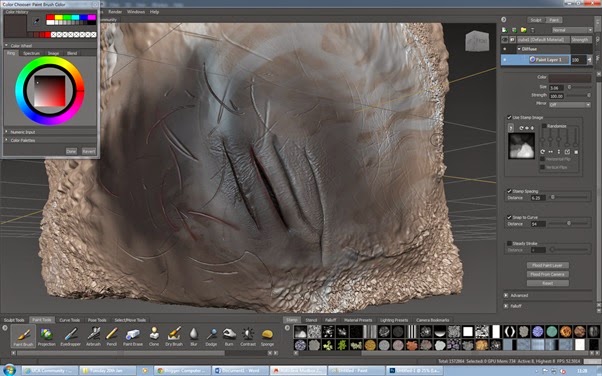
I created scars using the knife tool. I then used the pinch tool to drag the edges together to make them look more like scars.

Using the freeze tool I marked out the scars so they don't change when I sculpt around them.

I created a basic texture in Photoshop to look like scars that match the scars I have already created. 

I then gray scaled the image so that it can be applied to a model in Mudbox using the paint brush. 

Gray scaled texture.

I applied this new texture using the sculpt tool and the brush I had just created. I then painted over the model so that the scars look more realistic.
Creating a 3D texture using a bump map. Bump maps trick the eye into thinking the model is 3D when actually the model is flat. The texture simply replicates what would happen if the model was 3D. It replicates the light and shadow that would exist if the model was 3D.
Applying a material preset to the object.
Next we started to shape the default model of a T-Rex provided by mud box. I drew on top of the model using a tablet. I copied the design of a V-Rex from Peter Jackson's King Kong. Hopefully I will be able to replicate the head of the V-Rex.

Lining out the basic shape.

I've shaped the top of the skull and begun shaping the jaw line.

Here I have begun sculpting the back of the T-Rex's head.

I finished sculpting the top/ spine of the T-Rex.

Monday, 19 January 2015

Life Drawing: January 2015


Here are all of my life drawings from January 2015.

Warm up drawings.


Focusing on light and shadow.


I ran out of time with this drawing. I focused on shading and the transition between light and dark areas.

A rushed drawing completed by quickly and aggressively moving the charcoal around the paper.

Drawn with charcoal without using any straight lines, I used only a continuous squiggle and bounced my hand around the page.

A selection of warm up drawings.

Light pencil strokes make up this image. Unfortunately I ran out of time whilst drawing.

Pencil on paper. Here I focused as much as possible on getting any detail I could into the drawing.

Pencil on paper.

This was drawn using 2 pencils strapped together. It was very difficult to get any sort of detail into the image forcing me to ignore any small features.

Thick graphite stick. Again much like the two pencils strapped together  I was forced to ignore any specific detail due to the thickness of the graphite stick.

Anatomy: Drawing Muscle Groups


Drawing the human anatomy accurately is very important for an artist. It is good practice to understand where muscle groups are placed and how they move. This is especially important when creating an animation of a person moving. 

I have been drawing various muscle groups in order to understand them better.

0.5mm Mechanical Pencil and 6B pencil.
Here you can see how I have drawn out and labelled part of the chest and the right arm.

Tuesday, 6 January 2015

Maya: Modelling the Enterprise

This is a project given to us by Robin to build a basic version of the old Enterprise from the first series of Star Trek.

We were given some blueprints that we brought into maya, using these blueprints I will build the ship so that everything is in proportion relative to each other.

Blueprints arranged at the correct scale and placed in line with each other.


Using the blueprints as a guide I created the body of the ship and shaped the hull to match the image.


You can see here how I adjusted the vertices and edges to line up with the hull. I shaped this by using the smooth view and adding multiple edge loops onto my object.

I added the dish on the front of the hull using the bezier curve tool. This allowed me to create a smooth outline that covered the top half of the dish. I then revolved the shape/ line by 360 degrees along the x axis. This created a dish which I then converted to a polygonal shape by converting the NURBS into polygons.


The iconic disk at the front of the ship was then added.


I built up the top of the disk using the blueprints as a guideline along with the support connecting to the main hull.

Creating and placing the engines.
I created the engines by outlining the blueprints using the bezier curve tool then revolving the shape. The supports for the engines were made very easily using skewed shapes, I added detail using the extrude tool.

The ship pieced together.


After piecing the ship together I added any small details to create an element of authenticity (lights) in my work.

The final basic model ready for texturing.

Profile view of The USS Enterprise to scale with the blueprints.
After looking at the model in detail I have noticed the lack of detail on the rear of the hull, if I revisited this project I would spend more time focusing on the small details so that my final outcome felt more believable. I would also give the disk on the front of the ship more sub divisions to help smooth out the edges. You can clearly see where the edges meet in the first rendered image I have here, adding more sub divisions will help even this out. I would also add a lot more detail to the model although I could save polygons by creating a normal map to apply along with the textures. Overall I feel however that this model was a success. I have built the model to the correct proportions.